Why I built this?
I made the Nmap Dashboard as a way to teach myself Python, not just learning the syntax, but actually using it to build something useful. I didn’t want to just follow along with tutorials. I wanted to create a tool that worked, that could solve a real problem, and that would push me to figure things out as I went.
It started out simple: just a basic web app to display Nmap scan results. But as I kept working on it, the project kept growing. I added more features like risk-based tagging, PDF exports, scan comparisons, undo delete, and others all because I kept asking myself “what else can I make this do?” Bit by bit, it turned into a full dashboard.
I built the whole thing from scratch. It’s not based on any existing project just something I wanted to figure out for myself. I developed it on a Ubuntu VM, which also gave me a chance to improve my Linux skills. Eventually, I moved it over to Docker to make it easier to use and more portable. The Docker setup is written for Linux, and that’s the environment I’ve focused on the most.
This project also helped me understand how things work under the hood, like managing file paths, logging system activity, and using SQL to store scan data. I wrote additional Python scripts outside the main app to help reset the database or archive scans, which I run directly from the Linux terminal. It became more than just a web app — it was a way to reinforce everything I’d been learning about the OS, scripting, and backend logic.
One thing I want to be transparent about is that the frontend was AI-generated, every piece of html code was generated by AI, and I also used AI throughout the project as a helping hand. Whether it was debugging tricky Python errors, thinking through logic, or getting inspired for new features, AI was a big part of how I pushed my skills further. It helped me go from basic Python knowledge to building something much more complex faster than I could’ve done on my own.
This project reflects a lot of learning and growth. It started as a way to get more hands-on with Flask and Python, and ended up almost as a full fledged tool I could use. I didn’t expect it to turn into a full dashboard, but that’s what it transitioned into.
Demo Demonstration
This GIF shows the interface I built including scan viewing, tagging, exporting, and comparison features all wrapped in a user-friendly layout built with Flask and Python. Unfortunately I can’t share the details in depth as that would result in me exposing my network info.
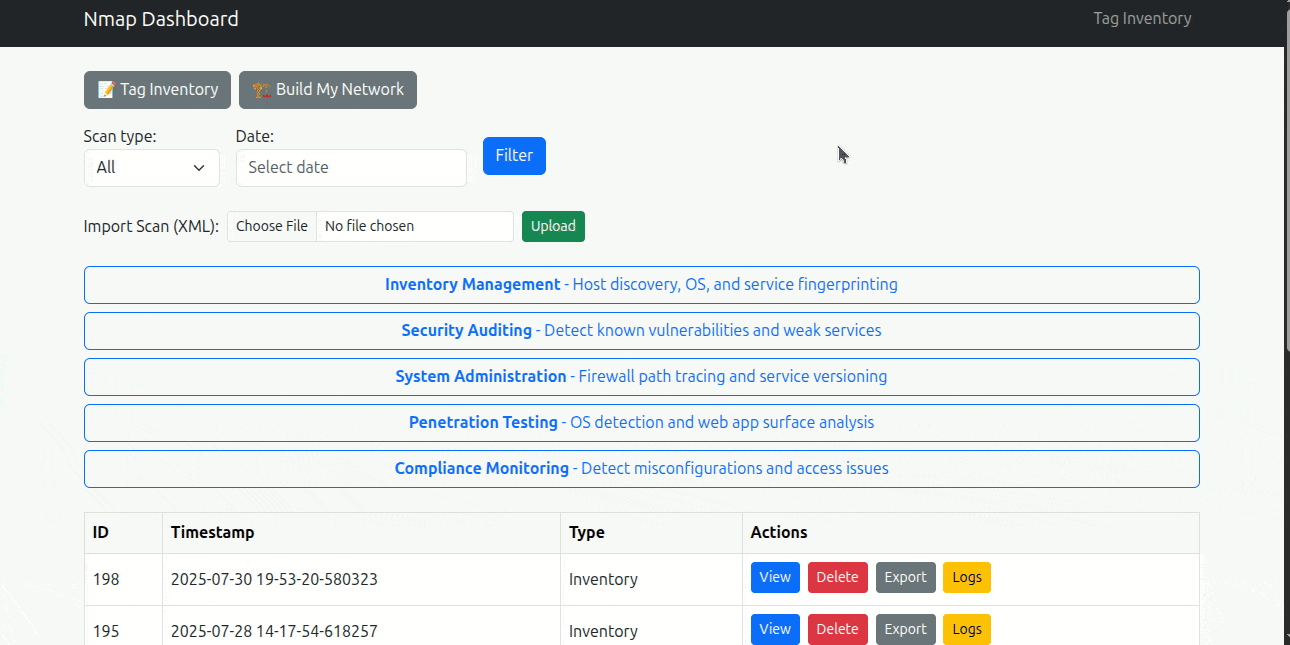
Table of Content
- Key Features of the Nmap Dashboard
- Tech Stack
- How It Works: Architecture Overview
- Code Deep Dive 1: Smarter Parsing with Tags and Risk Scoring
- Code Deep Dive 2: Tagging, Risk Scoring & Exporting in scans.py
- Code Deep Dive 3: Intelligent Port-by-Port Scan Diffing
- Challenges I Faced
- What I Learned
- Things I’d Improve Next Time
- Links
- Final Thoughts
Key Features of the Nmap Dashboard
Here’s what the dashboard currently supports:
- Clean, Searchable Scan Tables
View and filter scan results in a neatly organized table — showing IPs, MAC addresses, hostnames, ports, service types, and more. - One-Click Scan Buttons
Run tailored Nmap scans directly from the dashboard — including Inventory management, system administration and others. Each scan runs predefined Nmap flags suited for different use cases. - Scan Log Generation
Every scan produces a log file with full terminal output, so nothing gets lost. You can view and download these logs directly from the dashboard to review Nmap’s raw output. - Risk-Based Tagging System
Tags are auto-suggested based on port/services detected (e.g. SSH, HTTP, Telnet). You can also manually tag devices to track vulnerabilities or group hosts by importance. - Scan History & Comparison Tools
Instantly compare two scans of the same host or network to see what changed — such as new open ports, offline hosts, or updated services. - ZIP Importing with Undo Delete
Import archived scans from ZIP files. Accidentally deleted something? The undo preview lets you restore deleted entries safely. - PDF Report Exporting
Turn any scan into a formatted, printable PDF that includes hosts, ports, statuses, and all applied tags. - Custom Scripts for Linux Terminal Use
Separate Python tools allow you to:- Reset the database
- Archive or restore scan sessions
These run outside the dashboard, directly in a Linux shell.
- Docker-Ready for Linux
The entire app runs in Docker (host networking) with a Linux-first setup — making it easy to deploy and portable across systems. - Discreet Logging System
Key actions — like tag edits, deletions, or file imports — are quietly logged in the background to a log file.
Tech Stack
These are the main technologies and tools behind the Nmap Dashboard:
- Python – Core programming language used to handle logic, data parsing, scan control, and backend processes.
- Flask – Lightweight web framework used to build the dashboard structure, route handling, and API endpoints.
- SQLite – Local relational database to store scan results, tagging info, logs, and metadata.
- HTML + Jinja2 Templates – Used to render dynamic scan tables and pages inside the Flask app.
- Bootstrap (via HTML templates) – Used to improve UI layout and responsiveness with clean, pre-built components.
- Docker + Docker Compose – Used to containerize the app for easy deployment. The Dockerfiles and
docker-compose.ymldefine the environment setup and networking. - Nmap – The core scanning engine used to run full, quick, or custom scans — integrated with Python backend logic.
- Linux (Ubuntu) – The development and runtime environment for the app. All features were built and tested in a Linux-based VM.
- AI Tools (ChatGPT) – Used as a learning resource and development assistant. Helped debug Python code, brainstorm features, and generate the frontend layout.
Note: While the frontend was AI-generated, the core application logic, scan handling, database design, and tool scripts were all built manually to support learning goals and reinforce real-world understanding.
How It Works: Architecture Overview
At its core, the Nmap Dashboard revolves around processing Nmap scan results and making them accessible, searchable, and actionable inside a web interface. There are two main ways to bring scan data into the system:
- Run a new scan directly from the dashboard using one of the built-in scan buttons.
- Import an existing
.xmlNmap scan file manually.
In both cases, the scan data is processed by a custom parser script (parse2_nmap.py), which extracts host and port information, calculates risk scores, and applies suggested tags based on past tagging behavior. The parsed results are then inserted into a local SQLite database (nmap_results.db).
Surrounding this scan workflow are features designed to help users manage and analyze their network scans more effectively:
- Manual tagging of hosts or ports for customized categorization
- Scan comparison to track changes over time
- Soft deletion and undo restore for safe editing
- PDF export for reporting or documentation
- Detailed logging, stored in a
logs/directory outside the app
Outside the dashboard itself, I created supporting Python scripts that can:
- Reset or archive the database
- Manage
.xmland.txtfiles - Help maintain the project entirely from a Linux terminal if needed
This blend of automated parsing, manual tagging, data persistence, and utility scripts makes the app both flexible and educational — it’s not just a project, but a hands-on tool I actively used to reinforce both my Python and Linux fundamentals.
Code Deep Dive 1: Smarter Parsing
At the heart of this project lies parse2_nmap.py a custom-built parser that doesn’t just extract raw data from Nmap XML scans, but adds intelligent enrichment through auto-tagging and risk scoring.
Once the XML file is parsed, I loop through each <host> and <port> block. But instead of blindly dumping data into a database, I added several enhancements to make each record more meaningful and actionable.
Service Detection + Script Parsing
For each detected port, the parser extracts metadata like the service name, product banner, version, and any script output:
pythonCopyEditservice = service_elem.attrib.get("name", "") if service_elem is not None else ""
product = service_elem.attrib.get("product", "") if service_elem is not None else ""
script_output = parse_scripts(port)  # parses <script> tags
Automatic Tag Suggestions
If the current device or service hasn’t already been tagged — either in this scan session or globally — I use a custom-built suggest_tags() function to generate relevant labels:
pythonCopyEditdevice_tag, service_tag = suggest_tags(addr_ip, port_id, service, mac_vendor=vendor, os_match=os_match)
if device_tag and not session_tags.get("device") and not global_tags.get("device"):
    set_tag(session_id, addr_ip, mac_addr, "device", device_tag, cursor)
This ensures consistency across sessions, even when scan targets change IPs or services shift.
Risk Scoring Per Port
Each open port is assigned a risk score based on heuristics that evaluate the service type and port number:
pythonCopyEditrisk = compute_row_risk_score(port_id, service)
For example, an open SSH port on 22 might be lower risk than an unexpected web service on port 8080.
Clean Database Insertion
Finally, all parsed and enriched data is inserted into the scan_results table:
pythonCopyEditinsert_scan_result(session_id, entry, cursor, risk_score=risk)
This logic ensures that every scan result is not just stored — it’s contextualized.
Want to see the full source?
Browse the complete parse2_nmap.py on GitHub.
Code Deep Dive 2: Tagging, Risk Scoring & Exporting in scans.py
While the parser extracts and enriches scan data, the real magic happens when users interact with individual scan sessions through the scans.py module. This route file powers session analysis, tag management, risk visualization, and even PDF exports.
Session-Level Drilldowns
Each scan session is viewable at /scan/<session_id>, where filters can be applied for IPs, ports, services, or tags. Risk scores are aggregated per host, and the most vulnerable IP is highlighted automatically:
pythonCopyEditcursor.execute("""
    SELECT ip, SUM(risk_score) as total_risk
    FROM scan_results
    WHERE session_id = ?
    GROUP BY ip
    ORDER BY total_risk DESC
    LIMIT 1
""", (session_id,))
This gives users immediate visibility into their highest-risk assets.
Suggested vs Global Tags
For every host, the dashboard cross-references existing global tags and offers AI-driven tag suggestions based on vendor, OS, service, and port. It even lets users apply tags session-wide or edit them manually:
pythonCopyEditsuggested_device, suggested_service = suggest_tags(ip, port, service, mac_vendor, os_match)
These tags are stored in a separate global_tags table and used to filter or group results for future scans.
Risk Explanations & Visualization
To explain why a host scored high risk, scans.py breaks down each port-level risk:
pythonCopyEditreason = f"Port {port}, Service '{service}', Score: {score}"
risk_reasons_by_host.setdefault(ip, []).append(reason)
In the dashboard UI, this helps users quickly understand why a host is flagged — not just that it was.
It also generates simple charts (bar graphs) for port and service frequency using values like:
pythonCopyEditport_counts[port] = port_counts.get(port, 0) + 1
Export to PDF
A standout feature is the export to PDF button, which renders a timestamped, full formatted report of the scan session using WeasyPrint:
pythonCopyEditrendered = render_template("export_pdf.html", ...)
pdf = HTML(string=rendered).write_pdf()
This makes it easy to share results or keep reports for audit logs.
Want to see the full source?
Check outscans.pyon GitHub.
Code Deep Dive 3: Intelligent Port-by-Port Scan Diffing
One of the most technically robust components of my Nmap Dashboard is the compute_diff() function in db_utils.py. This function performs a granular, port-by-port comparison between two Nmap scan sessions — enabling the dashboard to show exactly what changed on a host and how.
Here’s a real example from the core logic:
pythonCopyEditfor port in ports:
    old = old_data.get(port, {})
    new = new_data.get(port, {})

    changes = {"port": port}

    if clean_lower(old.get("state", "")) != clean_lower(new.get("state", "")):
        changes["old_state"] = old.get("state", "—") or "—"
        changes["new_state"] = new.get("state", "—") or "—"

    if clean_lower(old.get("service", "")) != clean_lower(new.get("service", "")) or \
       clean_lower(old.get("version", "")) != clean_lower(new.get("version", "")):
        changes["old_svc_ver"] = f"{old.get('service', '')} {old.get('version', '')}".strip() or "—"
        changes["new_svc_ver"] = f"{new.get('service', '')} {new.get('version', '')}".strip() or "—"

    ...

    if len(changes) > 1:
        changes["full_old"] = {...}
        changes["full_new"] = {...}
        side_by_side.append(changes)
What Makes This Unique
1. Multi-field precision
Each port is compared across key attributes:
- Port state (
open,filtered,closed, etc.) - Service name and version
- Product info, OS guesses, CPEs
- Script output (e.g.
http-title,ssh-hostkey) - Host-level metadata (uptime, last boot)
This level of detail ensures meaningful diffs — not just noise.
2. Side-by-side formatting
The output is intentionally structured to support intuitive UI rendering. Users can view:
- What changed and on which port
- Before/after values for each field
- Extra context like hostnames, MAC addresses, and tags
This mirrors the usability of commercial tools like Nessus or Qualys — but built entirely from scratch.
3. Data normalization & error handling
To ensure consistency, all comparisons use normalization helpers:
pythonCopyEditdef clean(val): return (val or "").strip()
def clean_lower(val): return clean(val).lower()
This avoids false positives due to case differences or whitespace, and ensures robust behavior even when fields are missing.
4. Enriched context through tagging
After changes are detected, tags are fetched and merged from the tags database — adding descriptions like:
- “Web Server (nginx)”
- “Printer – Guest VLAN”
- “Risk: Critical”
This turns a technical scan diff into a readable, security-aware report.
Below is a example of the feature in use Mac Address is included for other Ips chose this photo as a example as it excludes Mac for security reasons

What This Says About My Skills
I think holistically — bridging raw scan output with readable, actionable results
I’m comfortable working with low-level data parsing and structured diffs
I prioritize both technical accuracy and usability
Challenges I Faced
1. Learning Python from Scratch
When I started this project, I had no experience with Python or coding at all. Even basic concepts were unfamiliar. I relied heavily on AI tools to help explain code line by line and slowly built up an understanding of how Python works.
2. Poor Initial Planning
Originally, I didn’t expect this project to grow as large as it did. I started with everything in one file and no real structure. As new features kept getting added, I had to constantly patch the code and rethink how everything fit together. This forced me to learn about Flask blueprints and refactor the project into a modular architecture. It wasn’t smooth but it was valuable.
3. Connecting Frontend to Backend
Even though most of the frontend design was generated completely with AI assistance, I still had to learn how to wire everything up. Figuring out how buttons should trigger routes, how to display dynamic data using Jinja templates, and how to get the right information on screen was a steep learning curve. Every new page was a new lesson in full-stack development.
4. Testing the Parser
One of the most time-consuming tasks was getting the Nmap XML parser to output exactly what I needed. Each change required running or importing different Nmap scans, which take time. I eventually realized I could save and reuse existing scan files to test faster and more efficiently — a small insight that made a big difference.
5. Logging the Right Way
At first, I used simple print statements. But as the project grew, I needed a robust logging system to track events across different modules. Setting up log files for specific features, formatting entries for clarity, and making sure logs persisted in production required experimentation — but taught me the value of well-planned debugging tools.
6. Using GitHub for the First Time
Before this, I had never used GitHub. Learning how to track changes, use commits properly, clean up my history, and manage a .gitignore file taught me that version control isn’t just about saving work.
7. Building Without a Tutorial
This dashboard wasn’t built by following a single guide. I had to figure out every part from Nmap parsing to Flask routes to PDF generation on my own, often with no exact answer available. That process, while frustrating at times, gave me much deeper problem-solving skills than any tutorial could have.
8. Migrating to Docker
Once the app was stable, I moved everything into Docker to make it easier to run across linux systems. That meant learning how to write a Dockerfile, manage volumes, deal with file permissions, and use docker-compose to orchestrate everything. It was a big step forward in understanding how real-world deployments work.
What I Learned
Working on the Nmap Dashboard pushed me out of my comfort zone and helped me grow across multiple areas of development and cybersecurity:
- Python fundamentals
I started with no experience in Python. By building this project, I learned how to structure programs, write functions, handle files, and use core libraries effectively. - Flask web development
From routing to Jinja templating, I learned how Flask apps are built and how the backend connects to dynamic HTML templates. I also learned how to organize larger apps using blueprints. - Full-stack logic
Figuring out how to trigger backend actions from buttons in the frontend gave me a deeper understanding of request/response cycles, form handling, and how front-end actions are wired to logic. - Nmap and network analysis
Beyond just using Nmap, I learned how to read its XML output, extract relevant info, and visualize it — which gave me a stronger grasp of ports, protocols, services, and network security principles. - Logging and debugging
I built a custom logging system that helped me trace errors and monitor app activity. I learned how to write logs to specific files, format messages, and make debugging easier. - SQLite and data relationships
Designing and querying a relational database taught me about foreign keys, joins, indexing, and the importance of clean data structure when building scalable applications. - Docker and app deployment
I containerized the entire project using Docker and Docker Compose, which taught me how to handle permissions, volumes, and make the app easy to deploy on any machine. - GitHub and project hygiene
This was my first time using GitHub seriously. I learned how to track changes, use.gitignorecorrectly, and publish a clean, shareable repo for others to use or build on.
Things I’d Improve Next Time
Start with Blueprints and Clean Architecture
In the beginning, I underestimated how big the app would become. I learned the hard way that organizing your project from the start pays off later. In future builds, I’d use Flask Blueprints and modular design right away to avoid technical debt.
Add Authentication and Access Control
Currently, the app assumes trusted users. A clear next step would be implementing proper login systems and permission handling to support multi-user access securely.
Better Security Practices
This app handles potentially sensitive scan data, so I’d like to improve on secure file handling, input validation, and reduce attack surface — especially if this were deployed in a production setting.
Plan Features More Carefully
This project grew organically, which led to some patchwork solutions. Next time, I’d plan out features more intentionally and stick to a roadmap to keep the codebase cleaner and the workflow more efficient.
Build Fully-Realized Features
Some features were built just to be functional — not polished. Going forward, I want to focus on completing features with real usability in mind, including edge cases, user feedback, and documentation.
Links
Final Thoughts
Working on this project gave me hands-on experience with building something practical using Python. I started with a simple idea and kept improving it while learning how to connect code, organize logic, and solve problems as they came up. Tools like Flask, Docker, and AI guidance helped me turn it into a full-featured network scanner dashboard that I can actually use. This project serves as great precursor to the tools and utilities I can create in the future with python.